
Most Premiere Pro tutorials promise to “speed up your workflow” by teaching you Ctrl+K to cut clips. That’s not what this is.
After optimizing editing workflows for clients producing 50+ videos monthly—from documentaries to law firm testimonials—we’ve identified the exact bottlenecks that separate 2-hour edits from 8-hour slogs.
The difference isn’t talent. It’s a systematic workflow architecture.
This guide reveals 12 compound optimizations that professional editors use to edit videos faster in Premiere Pro while maintaining sub-4-hour turnarounds on complex projects.
We’re talking hardware configurations that eliminate render wait times, proxy workflows that actually work in 2026, and automation strategies that Adobe doesn’t advertise but power agencies worldwide.
Recent Premiere Pro updates like AI-powered search, generative frame extension, and hardware-accelerated H.264 playback—combined with these workflows routinely cut total project time by 40–50% by eliminating wasted motion instead of adding more shortcuts.
- Leverage 2026 AI Features: Use Generative Extend to add frames and Media Intelligence for instant footage search.
- Apply Multi-Transitions: Edit and manage transitions across multiple clips simultaneously.
- Use Proxy Files: Leverage low-resolution versions to improve playback speed for large projects.
- Master Keyboard Shortcuts: Customize shortcuts, including a dedicated key for Premiere Pro’s AI search panel.
- Asset Library: Create libraries for sound effects, transitions, and footage to save time.
- Export Settings: Optimize with H.264 hardware acceleration for quality balance and fast delivery.
Why Premiere Pro for Speed-Optimized Workflows
Adobe Premiere Pro dominates professional video production not because of its interface, but because of its automation potential.
Unlike Final Cut Pro‘s locked ecosystem, Premiere Pro exposes nearly every function to keyboard customization, scripting, and third-party integration.

The platform’s cross-compatibility with Windows and Mac, combined with native Adobe Media Encoder integration and project-sharing capabilities, makes it the only viable choice for agencies managing distributed teams and mixed OS environments.
Mastering various techniques in Premiere Pro, such as scripting and keyboard customization, is essential for optimizing editing speed.
12 Premiere Pro Strategies to Speed Up Video Editing
1. Use 2026 AI Features That Actually Save Time
Recent updates added features that sound gimmicky but deliver measurable time savings when integrated into systematic workflows:
AI-Powered Footage Search
Click the magnifying glass icon in the upper-right corner of the main window, or open the search panel from the menu via Window > Search.
Then describe what you need—for example: “presenter looking camera left,” “b-roll city traffic,” or “wide establishing shot.”
The AI indexes visual content during import—no manual tagging required.
Real-world impact: A 4-hour footage review for a 15-minute testimonial video drops to 20 minutes with Premiere's "Media Intelligence".
Batch Transition Application
Select multiple clips (Shift+Click), and “Apply Default Transitions to Selection” with Shift+D. This applies to all selected edit points simultaneously.
On montage-heavy projects (50+ cuts), this eliminates 45+ minutes of repetitive clicking. Combine with custom transition presets for brand-consistent results across all projects.
Generative Frame Extension
Left-click clips and use the “Generative Extend Tool” to AI-generate additional frames at clip boundaries.
Use this when subjects cut off mid-sentence or B-roll runs 6 frames short.
In short: "Generative Extend" eliminates reshoot costs ($500-$2,000 per shoot day) for minor timing issues.
Hardware-Accelerated H.264 Decoding
On M3/M4 Macs and NVIDIA RTX 4070+ GPUs, hardware decoders handle H.264 playback well enough to deliver near‑ProRes performance without transcoding.
Test this first: if 4K H.264 plays smoothly at full resolution, you can safely skip proxies and recover 2–3 hours per project otherwise spent on transcoding.
2. Hardware Configuration: Specific Recommendations
Hardware bottlenecks cost more than equipment upgrades. Here’s what actually matters for sub-4-hour turnarounds on 4K projects:
RAM: 32GB Minimum, 64GB Optimal
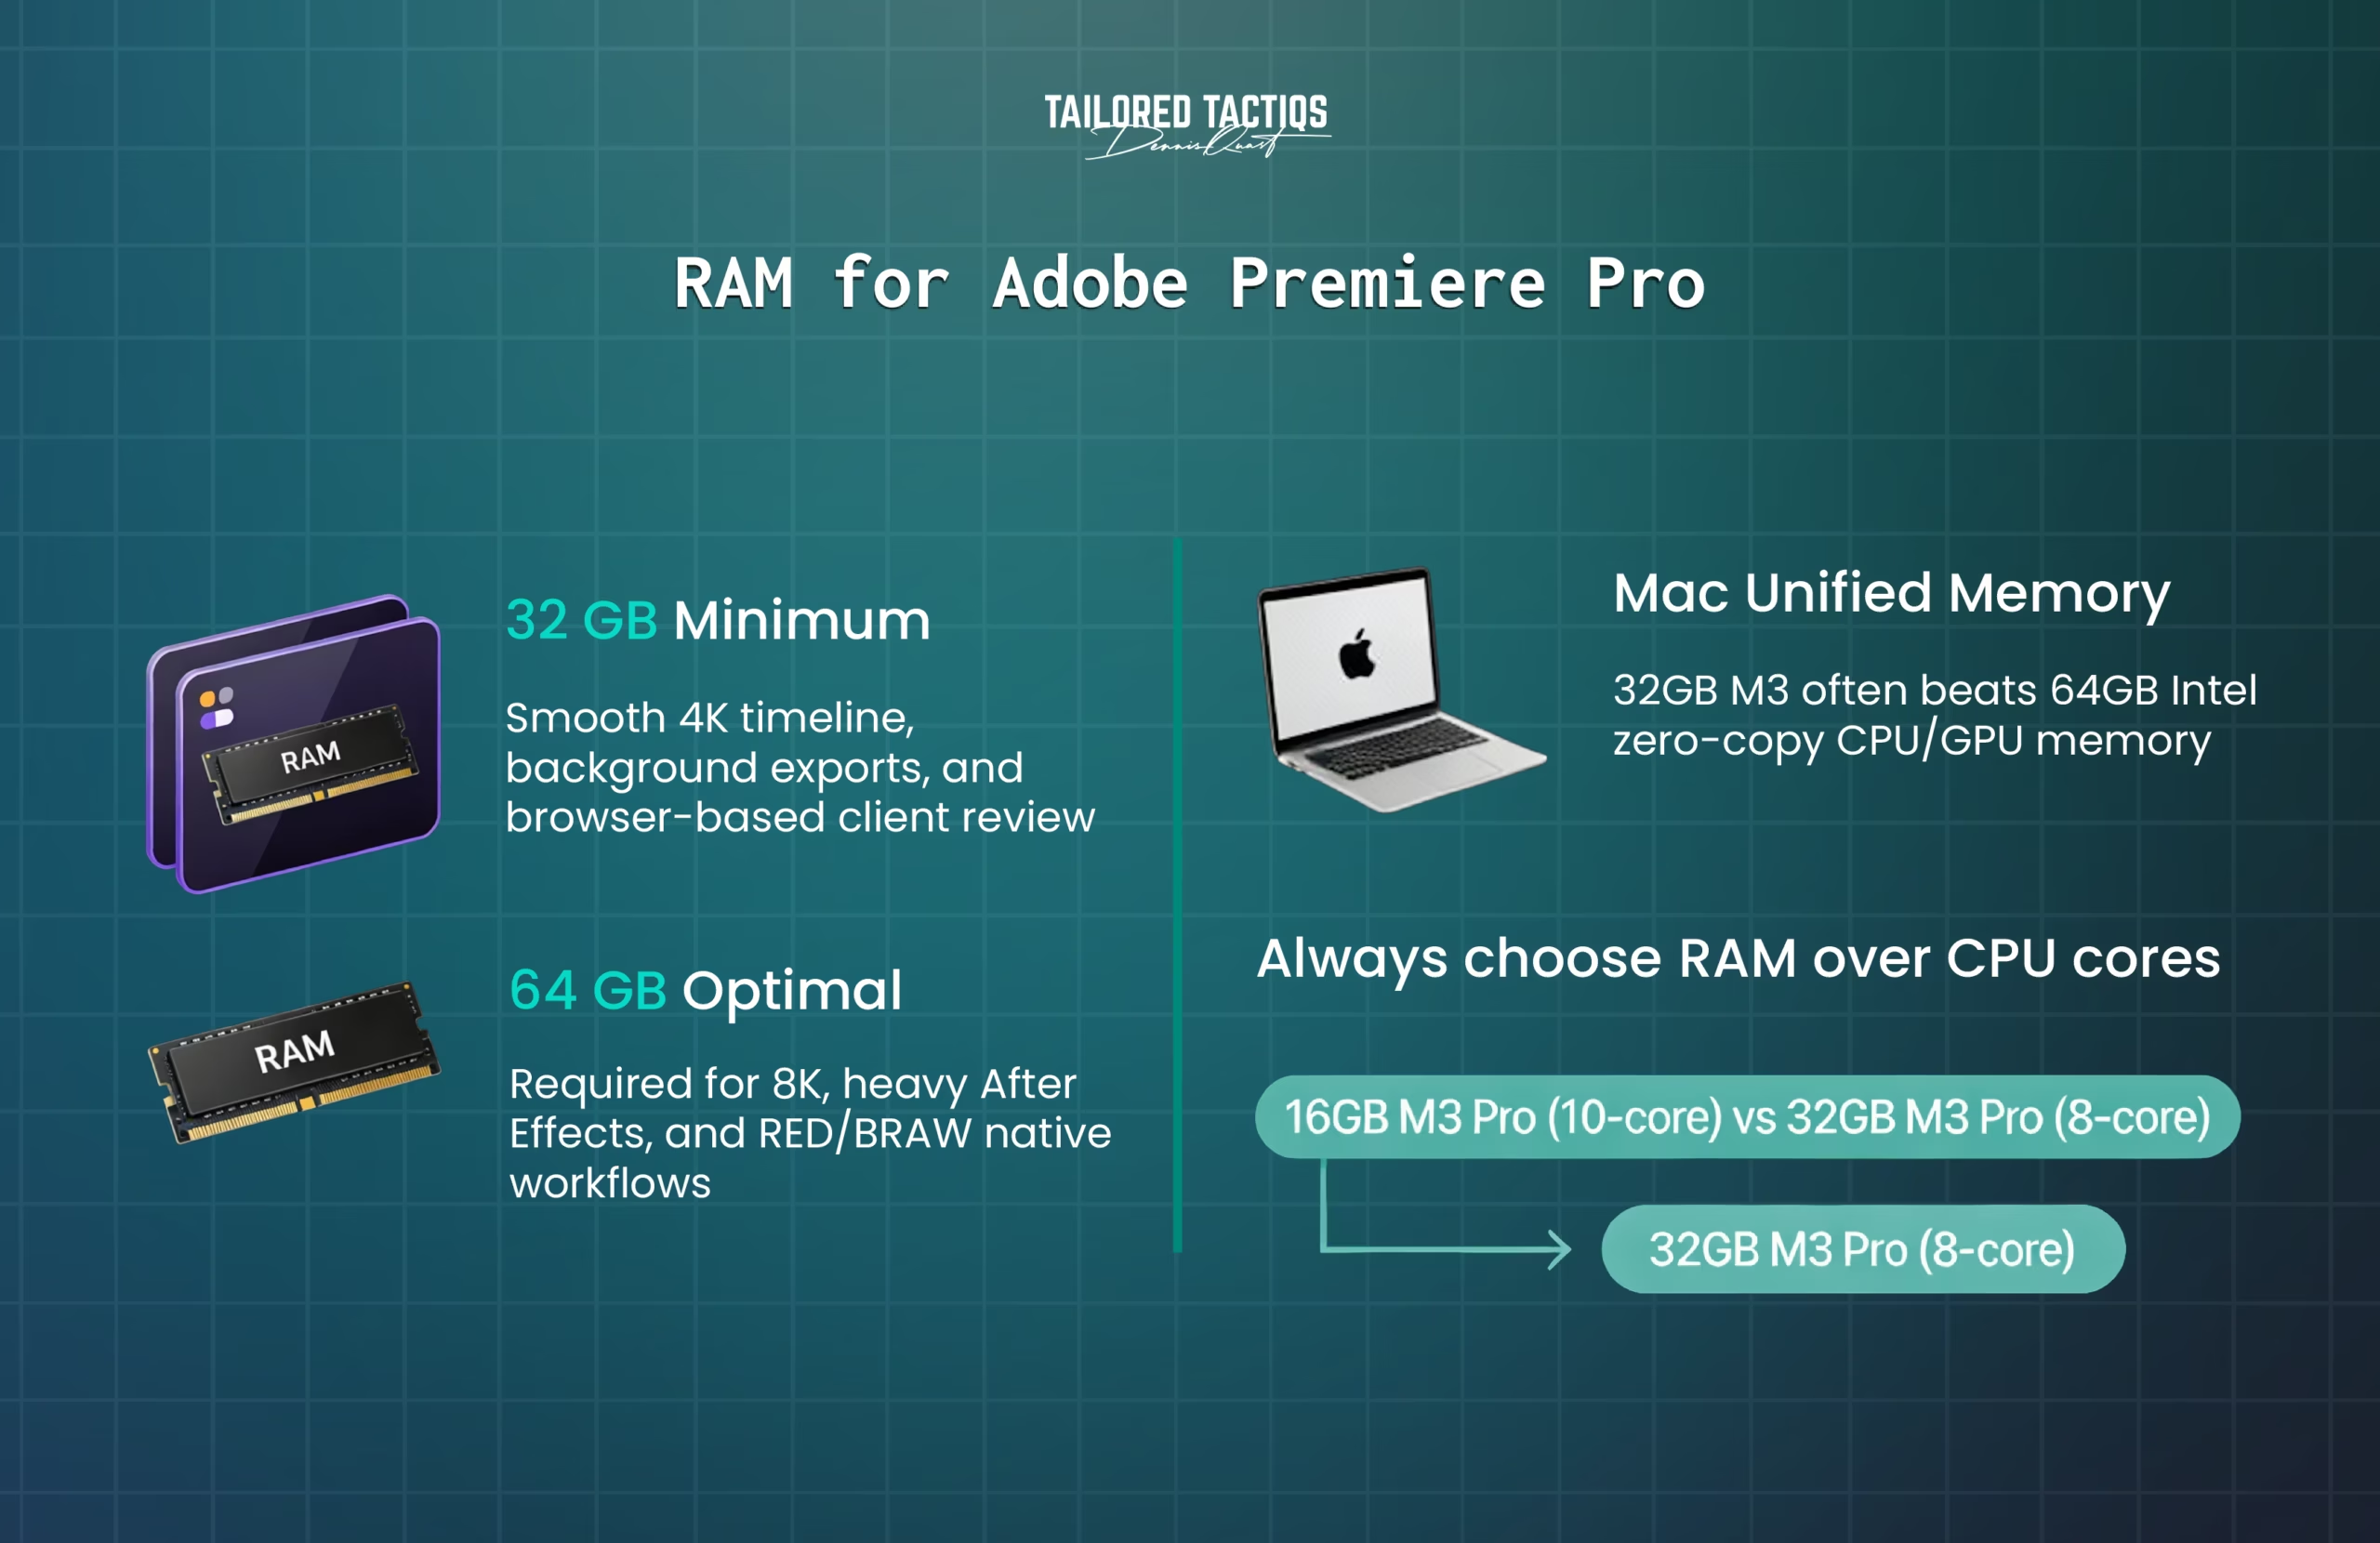
32GB handles simultaneous 4K timeline playback, background transcoding, and browser-based client review portals.
64GB becomes necessary for 8K work, tight After Effects integration, or RED/BRAW native editing.
For Mac users: unified memory means a 32GB M3 can outperform a 64GB Intel system because CPU and GPU share the same high-speed pool without copy overhead.
Configuration priority: if you’re choosing between a 16GB M3 Pro (10‑core) and a 32GB M3 Pro (8‑core), prioritize RAM over cores. Premiere Pro’s memory usage spikes during multicam and effect‑heavy sequences, while CPU utilization on modern chips rarely exceeds 60% in real projects.
Storage: NVMe SSD RAID 0 or Single Fast Drive
7000 MB/s NVMe SSDs eliminate storage bottlenecks for 4K playback.
Adobe traditionally recommends separating cache (scratch disk) from media, but on modern NVMe drives, single‑drive setups perform almost identically to dual‑drive configurations for projects under 500GB.
Save money on RAID controllers and put it into faster individual drives instead.
Practical setup: 1TB internal NVMe for OS and active projects, plus a 4TB external NVMe (Thunderbolt 4/USB4) for archives. Avoid SATA SSDs—they can bottleneck 4K ProRes playback.
GPU: 12GB VRAM Minimum for 4K
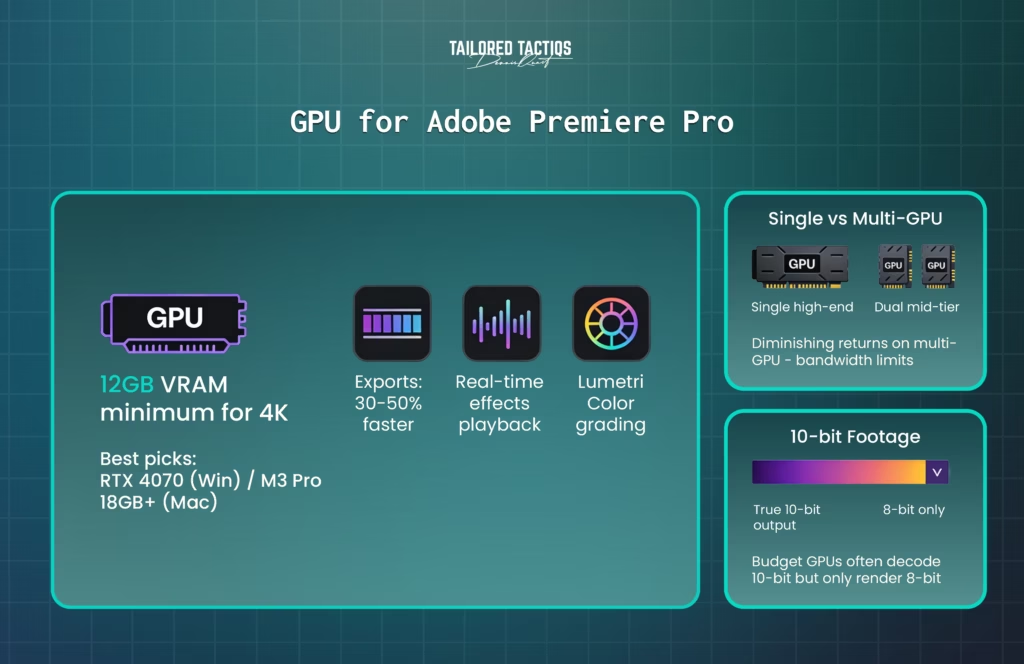
NVIDIA RTX 4070 (12GB) or higher on Windows, and M3 Pro with 18GB+ unified memory on Mac, provide enough GPU power for 4K export, real‑time effects playback, and Lumetri Color grading, often cutting export times by 30–50%.
Multiple GPU setups deliver diminishing returns; one high‑end GPU usually beats two mid‑tier cards because of memory bandwidth limits.
Specification detail: 10‑bit footage (Rec. 2020, HLG, HDR10) needs hardware with true 10‑bit output. Many budget GPUs can decode 10‑bit but only render in 8‑bit, which introduces visible banding in exports.
Display: 32″+ Ultrawide or Dual 27″ 4K
Ultrawide monitors (3440×1440 or 5120×1440) reduce or eliminate horizontal timeline scrolling, cutting 20–30 scrolls per minute during intensive edits.
Alternative: dual 27″ 4K monitors let you dedicate one screen to a full‑width timeline and the other to source/program and panels. For color‑critical work, use factory‑calibrated displays with Delta E < 2, such as BenQ SW series, EIZO ColorEdge, or Apple Studio Display.
3. Production Planning: Shoot for Post-Production
Editing speed starts during production. Shot-list storyboards reduce post-production decision paralysis—when you know exactly which shots complete each sequence, editing becomes assembly rather than creative exploration.

Shoot 3-second head/tail buffers on every clip.
This allows ripple edits without running into clip boundaries. B-roll coverage should be a 3:1 ratio (3 minutes B-roll per 1 minute A-roll) to avoid “we need more footage” delays during client revisions.
For a deeper breakdown of what B‑roll is and how to plan it strategically, see our guide to B‑roll in video production.
Retake bad shots on set. A 2-minute retake on set eliminates 30 minutes of post-production stabilization, rotoscoping, or shot substitution work.
Frame composition errors, focus issues, and shaky handheld shots should never reach the editing suite.
4. Codec Strategy: When to Transcode vs. Edit Native
H.264 and HEVC are delivery codecs, not editing codecs. They use inter‑frame compression, which means each frame depends on its neighbors, and the CPU has to decompress multiple frames just to show one, often spiking CPU load during playback.
ProRes and DNxHD are intra‑frame codecs—each frame is self‑contained—so scrubbing is smoother, and cuts are frame‑accurate.
2026 Exception: on M3/M4 Macs and RTX 4070+ GPUs, hardware decoders handle H.264 well enough that transcoding may be unnecessary for standard 4K 4:2:0 footage. Test first: if full‑resolution scrubbing stutters, transcode; if it’s smooth, skip transcoding and save 2–3 hours per project.
Transcoding Workflow
Use Adobe Media Encoder’s “Watch Folders” to automatically transcode incoming footage. Set up a folder that triggers H.264 → ProRes 422 Proxy conversion when new files appear.
This allows the DP or producer to deliver footage throughout the day while transcoding happens unattended.
Proxy Files for 4K+ or RAW Footage
To edit videos faster in Premiere Pro, especially when working with high-resolution footage like 4K or 8K, create proxies—lower-resolution or lower-bitrate copies of your original files.
In Premiere Pro, you can easily toggle proxies on or off, switching between the lower resolution proxies for efficient editing and the original high resolution files for final export. This workflow is particularly beneficial on slower hardware or with demanding footage.
Generate 1080p ProRes Proxy files at 25% original resolution. Premiere Pro automatically switches to full-resolution originals during export.
Proxy workflow adds 1-2 hours upfront but saves 10-15 hours during editing on multi-day projects.
Check out Premiere Gal’s brilliant video below for more detailed instructions on how to work with proxies:
To further edit videos faster in Premiere Pro, adjust the playback resolution in the Program Monitor. Lowering playback quality to 1/2 or 1/4 playback resolution reduces processing strain, minimizes lag, and enables smoother real-time previews—especially when working with lower resolution proxies.
This simple step can significantly improve editing efficiency.
Skip proxies for: 1080p footage, ProRes/DNxHD originals, or any project under 30 minutes total runtime where hardware handles native playback smoothly.
Smart Rendering
Use “Render In to Out” on effect‑heavy sequences to pre‑render playback files. By default, this has no shortcut, so assign one in Premiere Pro’s Keyboard Shortcuts panel to cache effects once instead of recalculating on every scrub.
Enable “Use Previews” in Export Settings to leverage these cached files, cutting export times by 15-40% on heavily graded projects.
5. Project Organization: Scalable Folder Architecture
Disorganized projects cost 15-30 minutes per session on file hunting and media relinking. Standardized folder structures eliminate this friction.
Folder Structure Template
Consistent naming allows instant navigation and prevents “which folder has the music?” delays. The graphic below illustrates the folder hierarchy we’ve been using for many years.
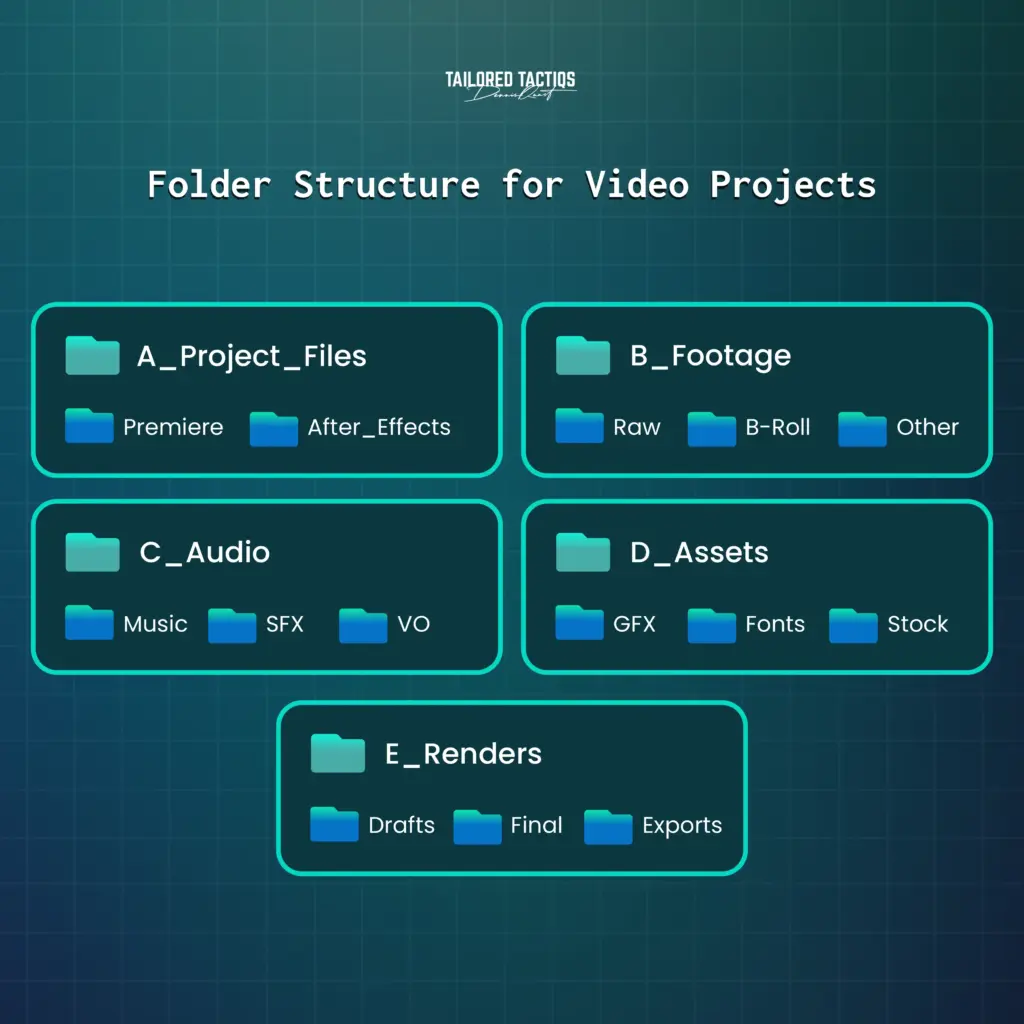
- A_Project_Files: .prproj files, autosaves, project archives. Subfolders for Premiere Pro, After Effects, and Audition.
- B_Footage: Raw (camera originals), Proxies (transcoded editing copies), B-Roll, Client-Provided.
- C_Audio: Music (licensed tracks), SFX (sound effects), VO (voiceover recordings), Stems (separated audio tracks).
- D_Assets: GFX (motion graphics, lower thirds), Fonts (project-specific typefaces), LUTs (color lookup tables), Stock (licensed stock footage/images).
- E_Renders: Drafts (client review versions), Final (approved deliverables), Platform_Exports (YouTube, Instagram, LinkedIn variants).
Automated Backup Strategy
Use GoodSync or a similar service to maintain two backup copies—one local (external SSD), one cloud (Backblaze B2, AWS S3).
Schedule incremental backups every 2 hours during active editing.
Project files often corrupt after crashes, power loss, or drive failure; backups are mandatory, not optional.
Pro tip: Use color labels in Premiere Pro's Project panel. Green for B-roll, blue for A-roll, yellow for pending review. Selection shift shortcuts (Shift+Click) combined with color filtering allow instant bulk operations.
6. Asset Library: Reusable Components
Maintain a separate project file called “Asset_Library.prproj” containing all reusable elements: branded lower thirds, standard transitions, title templates, color grades, and audio ducking presets.
Import bins (not individual clips) from this library into active projects.
Time savings: Creating a lower third from scratch takes 5-8 minutes. Importing a pre-built template takes 15 seconds. Over 50 projects annually, this saves 400+ minutes on redundant tasks.
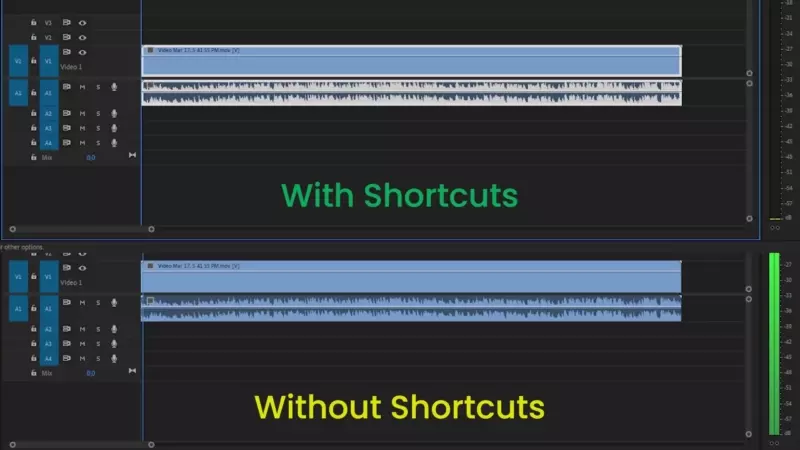
7. Keyboard Shortcuts: Custom Mappings for Speed
Default Premiere Pro shortcuts optimize for feature discovery, not speed.
Professional editors remap based on frequency and hand position. The goal: eliminate all mouse movements during timeline editing.
High-Impact Custom Shortcuts
Navigate to Edit > Keyboard Shortcuts (Win) or Premiere Pro > Keyboard Shortcuts (Mac) and remap these high-frequency commands:
- Add Edit (Cut): E (default: Ctrl+K/Cmd+K). Single key, no modifier, dominant hand.
- Ripple Delete: Delete (use Shift+Delete for lift delete). Ripple delete removes clips and closes gaps—the default behavior you want 95% of the time.
- Extend Edit to Playhead: Shift+E. Instantly trims the selected clip boundary to the current playhead position.
- Zoom to Sequence: \ (backslash). Fits the entire timeline to the screen width for quick navigation.
- Reveal in Project: Shift+F. Locates the source file of the selected timeline clip in the Project panel.
Essential Default Shortcuts
- Match Frame: F — Opens source clip at exact frame shown in timeline
- Ripple Trim Previous/Next Edit: Ctrl+Shift+[/] (Win) / Cmd+Shift+[/] (Mac)
- Nudge Clip 1 Frame: Alt+←/→ (Win) / Option+←/→ (Mac)
- Nudge Clip 5 Frames: Shift+Alt+←/→ (Win) / Shift+Option+←/→ (Mac)
- Apply Default Transition: Ctrl+D (Win) / Cmd+D (Mac) — Video; Ctrl+Shift+D/Cmd+Shift+D — Audio
- Audio Gain: G — Opens gain adjustment dialog
- Add Marker: M — Timeline markers for notes, sync points, to-do items
- Quick Search: Ctrl+F (Win) / Cmd+F (Mac) — Opens the Find dialog
Export your custom keyboard layout (File > Export) and store it in your asset library. Share across team members for consistent workflows.
8. Effect Presets: Batch Processing
Presets eliminate repetitive effect application. Rather than manually adjusting Lumetri Color 40 times per project, apply a saved preset in 2 clicks.
Various techniques, such as using effect presets and adjustment layers, can streamline batch processing in Premiere Pro, making it easier to edit videos faster and more efficiently.


Creating Reusable Presets
Apply an effect (Lumetri Color, Gaussian Blur, whatever), dial in settings, then right-click in the Effect Controls panel > Save Preset. Name descriptively: “LegalClient_Cinematic_Grade” or “Interview_NR_Standard.”
Store presets in categorized folders within your asset library project.
Pro tip: Use adjustment layers to apply presets to multiple clips simultaneously. Create an adjustment layer (Project panel > New Item > Adjustment Layer), place above timeline clips, and apply a preset to the adjustment layer. One effect instance affects all clips below.
This is much more efficient than applying effects to each clip individually, and it also helps ensure consistency throughout your project (more on adjustment layers later in the article).
Alternatively, you can use the Copy/Paste Attributes function to quickly apply effects from one clip to another, further speeding up your workflow.
Applying effects to a master clip or adjustment layer guarantees that all instances remain uniform, simplifying the editing process.
9. Audio Optimization: Faster Than Audition Back and Forth
Premiere Pro’s built-in audio tools handle 90% of needs without launching Audition. Audio Clip Mixer (Shift+9) adjusts individual clip levels, Audio Track Mixer (Shift+6) handles master output and track routing.
Essential Sound panel provides one-click presets for dialogue, music, SFX, and ambience.
Fast dialogue cleanup: Select dialogue clips, open Essential Sound > Dialogue, enable “Reduce Noise” and “Reduce Rumble.” This applies parametric EQ and noise gate in 10 seconds—adequate for 80% of interview audio.
Use the G key for quick gain adjustments, Ctrl+Shift+D/Cmd+Shift+D for audio crossfades. Track height shortcuts (Alt+Up/Down on Win / Option+Up/Down on Mac) expand waveforms for detailed audio editing.
10. Adjustment Layers and Nesting: Timeline Organization
Messy timelines with 40+ tracks slow navigation and increase error rates.
Adjustment layers and nested sequences keep complex projects organized so you can manage color, audio, and structure without fighting the timeline.
Adjustment Layers for Batch Effects
Create an adjustment layer (Project panel > New Item > Adjustment Layer) and place it on a track above your clips.
Any effect you apply to this layer affects all clips below, which is ideal for global color correction, vignettes, film grain, or sharpening—one layer instead of 50 duplicated effects.
If you’re new to adjustment layers, the video below walks through both the basics and more advanced techniques.
Nested Sequences for Complex Sections
Select multiple clips, right-click, and choose Nest to consolidate montages or multi-layer composites into a single timeline object.
This makes navigation easier, keeps effects grouped, and turns client requests like “make the montage 5 seconds shorter” into one trim instead of 20 separate edits.
Use the F key (Match Frame) to instantly load the source clip for the frame under your playhead, even when it’s inside a nested sequence. To open the nested sequence itself for detailed changes, double‑click the nest in the timeline or Project panel.
11. Systematic Editing: The Pass-Based Method
The “Assembly Line Method” is beginner advice. Professional workflows use Pass-Based Editing—completing one task across the entire timeline before moving to the next. This maintains focus and leverages muscle memory.
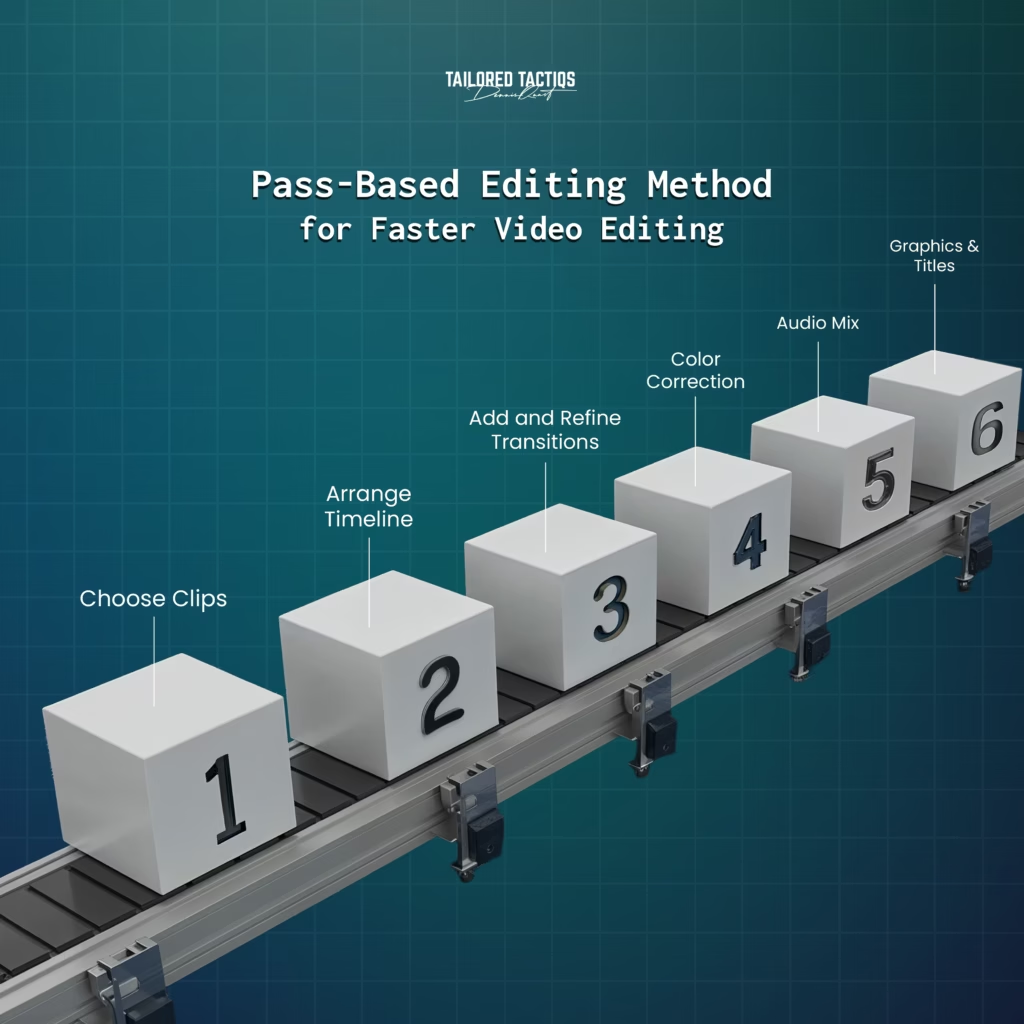
Pass 1 — String-Out: Place all usable clips in timeline order. Don’t trim yet—just get content sequenced. Use Ctrl+F/Cmd+F to quickly search for shots.
Pass 2 — Timing: Trim clips to exact durations. Use ripple edit (B key activates ripple trim tool) to maintain sync while adjusting. Add music and either lock that track in the timeline or unlink it from the video (Ctrl+L/Cmd+L) to avoid accidental edits.
Pass 3 — Transitions: Apply all transitions in one focused pass. Use bulk application (Shift+Click multiple edit points, right-click > Apply Default Transition). Adjust durations on exceptions afterward.
Pass 4 — Color Correction: Apply base correction with an adjustment layer or individual Lumetri Color effects. Match skin tones across all interview clips using reference scopes (Lumetri Scopes panel > Parade > RGB). Save the correction as a preset for future projects with similar lighting.
Pass 5 — Audio Mix: Dialogue levels first (target -12dB to -6dB peaks), music next (ducking under dialogue), SFX last. Use the Essential Sound panel for quick results or the track mixer for detailed control.
Pass 6 — Graphics & Titles: Lower thirds, captions, and end screens. Use the M key to mark every position that needs a title or graphic, then build all graphics in one pass against those markers. Create a dedicated caption track from the Text panel or via Sequence > Captions so dialogue, subtitles, and on‑screen text stay separate from main video layers.
In short: The Pass-Based Method eliminates context switching during video editing and maintains consistent aesthetic decisions throughout the entire project.
12. Export Optimization: Faster Delivery
Export settings significantly impact render times.
H.264 is standard for web delivery, but slow to encode. Hardware encoding (available on modern GPUs) cuts export times by 40-60% with minimal quality loss.
Fast web export settings:
- Format: H.264
- Preset: High Quality 1080p (or 4K)
- Hardware Encoding: ON (NVIDIA NVENC or Apple VideoToolbox)
- Bitrate: VBR 2-pass with target 10-15 Mbps for 1080p or 25-35 Mbps for 4K
Enable “Use Previews” to leverage smart-rendered sections.
High-quality master archive:
- Format: ProRes 422, no hardware encoding needed (ProRes encodes fast natively).
Store masters for future repurposing or uprezzing.
Pro tip: Reassign Ctrl+M (Win) /Cmd+M (Mac) from the default Export dialog to “Add to Media Encoder Queue” in Keyboard Shortcuts to send exports to Media Encoder for background batch rendering while you keep editing.
FAQ: Common Questions About Editing Faster in Premiere Pro
How can I edit videos 50% faster in Premiere Pro without buying new hardware?
Start with keyboard shortcuts (customize your top 10 most-used commands), use adjustment layers for batch color grading instead of clip-by-clip edits, create an asset library for frequently used transitions and effects, and organize your project files with a clear folder structure. These workflow optimizations require zero additional spend and, on well‑structured projects, can cut hands‑on editing time close to in half.
What’s the fastest way to find specific footage in a large Premiere Pro project?
Press the magnifying glass icon or open Window > Search to access Premiere Pro’s AI‑powered footage search. Describe what you need—“presenter looking camera left” or “b‑roll city traffic”—and the Media Intelligence system scans your clips to find matches without manual scrolling through hundreds of files. On multi‑hour shoots, this can turn a 4‑hour footage hunt into minutes.
Should I still transcode H.264 footage to ProRes in 2026?
Test editing H.264 directly first. If you have an M3/M4 Mac or RTX 4070+ GPU, recent hardware decoder improvements mean many editors can skip transcoding for standard 4K H.264. Transcode only if you see dropped frames or sluggish scrubbing at full‑resolution playback. This saves 2-3 hours of preprocessing time per project.
What hardware upgrade improves editing speed the most?
Priority order: first, move to 32GB RAM if you are below that—this immediately improves timeline responsiveness and reduces crashes. Next, switch from HDD or SATA SSD to an NVMe SSD, which often delivers 2–4x faster file access. After that, invest in a GPU with 12GB or more VRAM for smoother playback and roughly 30–50% faster exports. A CPU upgrade usually has the smallest impact on modern Premiere systems, so treat it as the last step.
How do I apply transitions to 50+ clips at once?
Select every cut that needs the same transition (Shift+Click across clips), then right-click any selected edit point and choose “Apply Default Transition.” Premiere drops your default video or audio transition across all selected cuts at once, replacing 50 manual actions with a single command.
What’s the difference between nested sequences and adjustment layers?
Use nested sequences to simplify structure, and adjustment layers to simplify effects. Nesting collapses a complex section (like a montage or graphics stack) into one clip so the main timeline stays readable. Adjustment layers sit above clips and carry effects such as color, grain, or vignettes, so you tweak one layer instead of 20 individual clips and keep the main timeline readable even on complex projects.
Conclusion: Implementation Strategy
These 12 optimizations compound—each improvement removes friction from subsequent steps. Start with hardware validation (test H.264 playback before transcoding), implement keyboard shortcuts for your 10 most-used commands, then build your asset library over the next 5 projects.
The difference between 8-hour and 4-hour editing workflows isn’t talent or speed—it’s systematic elimination of wasted motion. Every file search, every manual transition application, every codec transcode you don’t need represents time recovered for creative decisions or additional projects.
For agencies managing video at scale, these optimizations aren’t optional. They’re the difference between profitable operations and burning out your team on preventable inefficiencies.
If you want to know more about video marketing strategy and how content distribution amplifies production efficiency, check out our comprehensive video marketing guide. It covers everything from content planning to platform-specific optimization strategies.